Turning a picture into a CNC carving can bring artwork, family photos, and unique designs to life in an impressive and tangible way. Whether you want to create intricate carvings for gifts, business projects, or home decor, the CNC router offers precision and versatility. This guide will teach you how to transform your favorite images into beautiful carvings using a CNC machine, with a focus on every step from preparing the image to the actual carving process.
Understanding CNC Carving Basics
What is CNC Carving?
CNC carving involves using a Computer Numerical Control (CNC) machine to carve intricate designs into materials such as wood, metal, acrylic, and even stone. The CNC machine uses specialized bits to follow a pre-programmed path, allowing it to create highly detailed carvings. The precision and repeatability make CNC carving an excellent choice for turning a picture into a physical object.
To convert an image into a carving, you must first transform it into a format that the CNC machine can understand, usually using vector graphics or G-code.
Benefits of CNC Carving from Images
- Personalization: You can convert a picture into a physical item, such as family photos or logos.
- High Precision: CNC machines provide detailed carving, allowing for the recreation of even intricate designs.
- Versatility: A wide variety of materials can be used, from wood to metal.

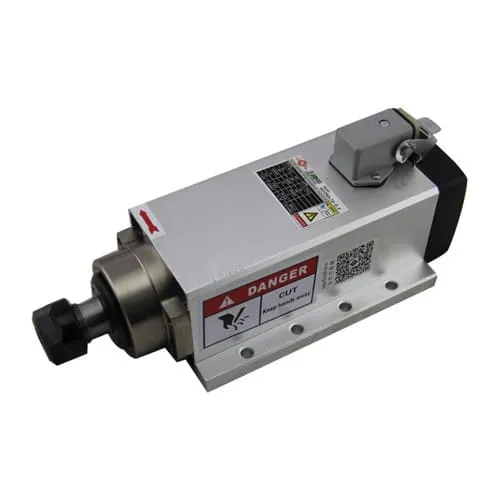
The 2.2KW ER20 Square Air-Cooled Spindle can be a reliable component for ensuring smooth and detailed CNC carving operations.
Steps to Turn a Picture into a CNC Carving
1. Choosing the Right Image
Selecting a good-quality image is crucial for producing an excellent CNC carving. Not all images are ideal for CNC, so here are some tips:
- High Resolution: Ensure that the image is of high resolution. The more details in the image, the better the final carving will be.
- Contrast: Images with high contrast work better, as it helps the software distinguish between different elements more clearly.
- Simplified Features: Avoid overly complex images. Photographs with too many details might lose quality when converted into a CNC-compatible format.
2. Converting the Image into Vector Graphics
Vector graphics are essential because they define lines and curves that the CNC machine will follow. To convert your picture into a vector format:
- Using Software: Use software like Adobe Illustrator, Inkscape, or CorelDRAW to convert the image to vector format.
- Image Tracing: This feature converts bitmap images (such as JPEG or PNG) into vector paths.
- Steps:
- Open the image in the software.
- Use the Image Trace feature to create vector lines.
- Save the image in a vector format such as SVG.
3. Preparing the Image in CAD/CAM Software
Once the image has been vectorized, the next step is to use CAD/CAM software to prepare it for carving. CAD/CAM software helps to define the tool paths and control the cutting operation.
- CAD Software: Use programs like Fusion 360, Vectric VCarve, or Aspire to import the vector graphic and adjust it.
- CAM Process: The CAM part of the software generates the G-code that tells the CNC machine exactly how to move the carving tool.
Key Aspects to Consider:
- Material Type: Specify the material type (e.g., wood, acrylic) as this affects the feed rate and spindle speed.
- Toolpaths: Define the type of toolpaths (e.g., pocketing, engraving, or profiling) and the depth of cut.
- Tools: Select the appropriate router bits for your project.
4. Choosing the Right CNC Router Bits
The type of router bit you use will have a significant impact on the carving quality.
- Ball Nose Bits: Perfect for creating smooth curves and intricate details.
- V-Bits: Excellent for engraving and detailed work, particularly in wood and softer materials.
- Flat End Mills: Best used for roughing operations to remove a large amount of material.
| Bit Type | Use Case |
|---|---|
| Ball Nose Bit | Smooth curves, intricate carvings |
| V-Bit | Fine detailing and engraving |
| Flat End Mill | Roughing operations |
For detailed work, consider a 60000RPM 1.2KW ER11 Water-Cooled Spindle, which offers the speed needed for precision.
5. Generating G-Code for CNC
G-code is a programming language used by CNC machines to understand how to move and cut materials. Once you have your vector image ready in CAM software, the next step is to generate the G-code.
- Feed Rate: Set the feed rate according to your material; for softer materials, a faster feed rate is acceptable, while harder materials need a slower rate.
- Spindle Speed: Choose an appropriate spindle speed to achieve a clean cut.
Example G-code snippet for engraving a simple line:
6. Setting Up the CNC Machine
1. Mount the Workpiece
Secure the material you will carve into on the CNC router table. It’s essential to keep the workpiece stable to avoid errors during the carving process.
- Clamps or Vacuum Table: Use clamps or a vacuum table to hold the workpiece firmly.
- Zero Point Setting: Use the CNC machine to set the workpiece zero point, typically at one corner or the center of the material.
2. Tool Setup
- Install Router Bit: Insert the appropriate router bit as per your toolpath requirements.
- Tool Length Offset: Set the tool length offset using G43 for proper depth control.
7. Carving the Picture
After setting up the machine and workpiece, it’s time to start the carving.
- Run a Dry Test: Do a dry run without engaging the spindle to make sure the toolpaths are correct and there are no collisions.
- Begin Carving: Once confirmed, start the carving by running the G-code file.
- Monitor the Process: Continuously monitor the process for any irregularities or machine issues.
8. Post-Carving Finishing
After the carving is complete, the piece will need some finishing touches.
- Remove Excess Material: Use sandpaper to remove burrs and smooth out the edges.
- Staining or Painting: Depending on the material, you might want to stain, paint, or apply a clear coat to protect the carving and enhance its appearance.
Best Practices for CNC Carving
1. Choose the Right Material
Different materials yield different results, and selecting the right one is crucial for achieving the desired look.
- Wood: Popular for CNC carving due to its versatility and ease of cutting. Softwoods like pine are easy to carve but may lack detail, while hardwoods like oak provide better detail.
- Acrylic: Provides a smooth finish and is ideal for decorative carvings.
- Aluminum: Great for durable projects but requires slower speeds and the right tooling.
2. Optimize Cutting Speed and Feed Rate
Properly adjusting the feed rate and spindle speed is vital for a clean cut. Too fast, and the machine may skip or create a rough finish. Too slow, and you risk burning or damaging the material.
3. Use Proper Safety Equipment
- Eye Protection: Always wear safety glasses when operating a CNC machine.
- Dust Extraction: Use a dust extractor or respirator to avoid inhaling fine particles, especially when carving wood or acrylic.

